Gluten-Free Pasta with Zucchini and Olive Oil Sauce
Tonight my friend Amy convinced me to go to boot camp class with her. The words "boot camp" make me nervous as I am picturing carrying boulders on my back with someone screaming in my ear as I sob (I can be a bit dramatic). Not to mention, Amy is super-athletic and I eat chocolate-peanut butter pie. But I am never one to shy away from a challenge, so I am going to give it a shot.
To do a workout like this, I need to have a light dinner before I go; something that will give me energy but won't weigh me down. Pasta with fresh vegetables sounds so good but traditional pasta sauce tends to upset my stomach when I work out. I like to eat pasta with an olive oil pasta sauce that is super easy to make. To make this dish, you need:


To do a workout like this, I need to have a light dinner before I go; something that will give me energy but won't weigh me down. Pasta with fresh vegetables sounds so good but traditional pasta sauce tends to upset my stomach when I work out. I like to eat pasta with an olive oil pasta sauce that is super easy to make. To make this dish, you need:
- 1 12 oz box of your favorite gluten-free pasta (I like Schar penne)
- 1 zucchini, chopped into thin pieces (you can really use any vegetables for this recipe; peppers, broccoli, even asparagus work)
- 1/3 cup plus 2 tablespoons olive oil
- 4 garlic cloves peeled, one minced
- Crushed red peppers
- Salt and pepper to taste
- 1/2 cup parmesan (optional)
After you boil and drain your pasta, saute the zucchini, or vegetables of you choice, with the 2 tablespoons of olive oil, minced garlic cloves, and salt and pepper, until the zucchini is slightly brown.
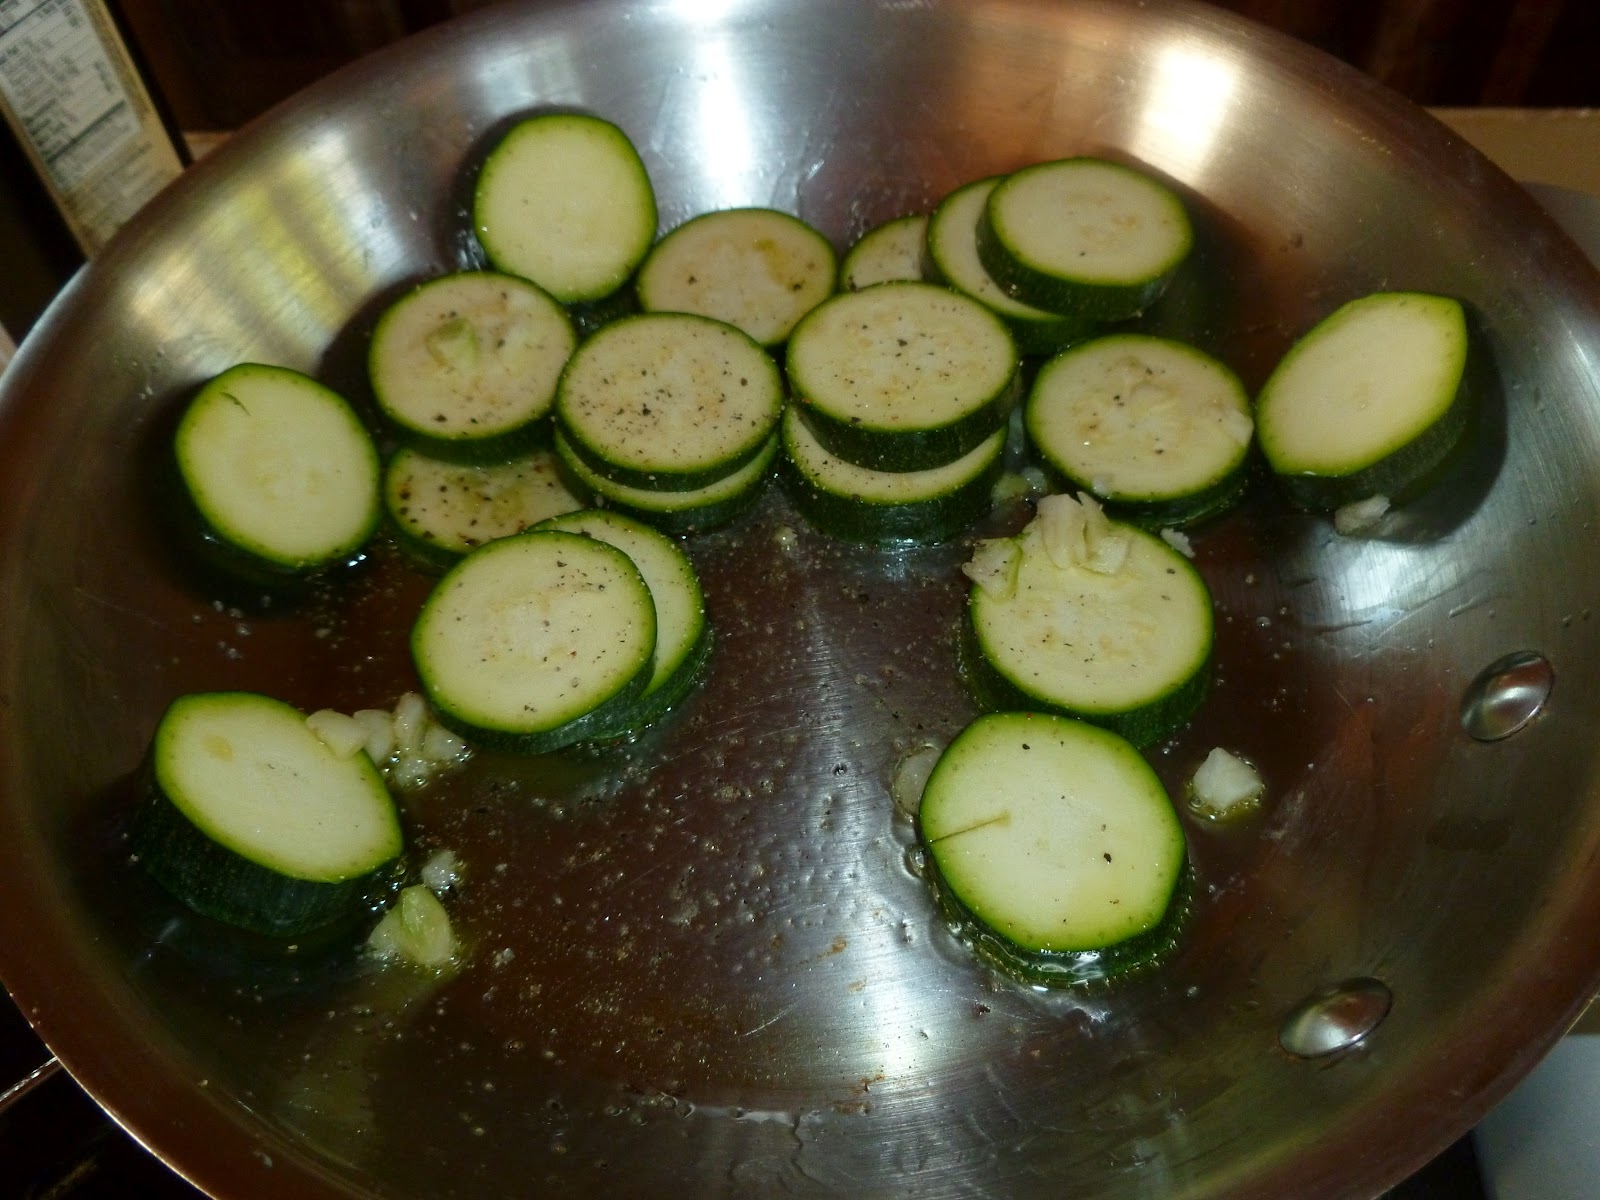
Once the zucchini is done, add it to the pasta. Pour the olive oil in a frying pan and place over medium heat. Take the remaining garlic cloves and add them whole to the olive oil. Cook the garlic cloves until they just start to turn brown and then remove them. This adds a nice garlic flavor to your sauce.

Once you remove the garlic cloves, add 1-2 tablespoons of crushed red peppers. You can adjust the amount depending on how spicy you like your sauce, but I wouldn't go under 1 tablespoon or your sauce will be a little bland. Cook for 1-2 minutes, stirring constantly. Then, add salt and pepper to taste and the sauce from the heat. Allow the sauce to cool for about 5 minutes and then add to your pasta and vegetables.

I also like to add 1/2 cup of parmesan to make the pasta take a little more sharp. But this is totally an option. This dish keeps really if you have left-overs. You could also add sauteed chicken for a little more protein.

Wish me luck at boot camp! If you have any favorite pre-workout recipes, add them to the comments section. I think I will add this to Allergy Free Wednesday
Gluten Free Potato Pancakes: A Quick Meal
Tonight was one of our "work party" nights, which basically means we call up relatives and beg them to help us work on our latest house project. My ever loyal mother-in-law took the call and agreed to come help us paint our window trim, which is about as fun as peeling sunburnt skin. We usually like to at least provide dinner for those who come over and offer their time, but tonight's plan backfired. The idea was to barbeque, but we did not get it ready in time. So not only did my mother-in-law have to spend her evening helping us paint, we had to ask her to bring vegetables from her garden. And of course she did because she is always happy to help us out. Armed with fresh new potatoes, lettuce, and onions, we had a short amount of time to put together dinner. The result: gluten-free potato pancakes.
What I love about potato pancakes is that they are quick, they are good for any meal, and they go with any side dish. You also do not need a lot of ingredients or counter space, both of which we are lacking, to make them. All you need is:


 You want to cook all of the pancakes soon after making the batter or the potatoes start to get soggy. Once they are all done, you can serve them with your favorite sauce. Ketchup or salsa go nicely with them. You can add any side dish you like to go with them or, use the pancakes as a side dish to go with your favorite meat. We added a salad with ours so we felt a little healthier. ;)

This is an easy, inexpensive, crowd-pleasing dish when you need to make something quick to fuel your work crew! :)
Any quick, gluten-free dishes that you like? Share the recipes in the comments section!
What I love about potato pancakes is that they are quick, they are good for any meal, and they go with any side dish. You also do not need a lot of ingredients or counter space, both of which we are lacking, to make them. All you need is:
- About 1 1/2 new potatoes
- 1/2 onion, diced
- 5 eggs, scrambled
- 1 tablespoon salt
- 1 tablespoon ground black pepper
- 1/2 cup of cooking oil (I used olive oil)
- Any herbs that you want to add (optional)
Wash and dry all of the potatoes. You can peel them if you like but I prefer to leave the skins on. Once the potatoes are dry, they need to be shredded like you would for hash browns.

Once all of the potatoes are shredded, you may need to wring them out for excess water. You can squeeze them by the handful over the sink and place the dry potatoes in a new bowl or place them in a strainer and pat them dry with a towel. Once all of the potatoes are wrung out, add the salt, pepper, and diced onion and mix well. You can also add any herb that you like to the mix for extra flavor; tarragon or basil go well. Then, mix in the beaten eggs. Make sure that the eggs coat all of the potato mixture as that is what keep the pancakes bound together.

Once the potatoes and eggs are mixed together, add about 2 tablespoons of oil to a pan. Make sure the bottom of the pan is well-coated. Then, put the pan on a burner and turn it to a medium-heat. Once the oil is well-heated, add a scoopful of the potato mixture to the pan. The pancakes can be any size that you like; ours were about 4 inches wide.

Let them cook for about 5 minutes before flipping them over. You want to make sure the pan does not get too hot or you will have raw potato in the middle of your pancake. Cook on the other side for 5 minutes as well before removing them from the heat.


This is an easy, inexpensive, crowd-pleasing dish when you need to make something quick to fuel your work crew! :)
Any quick, gluten-free dishes that you like? Share the recipes in the comments section!
Fresh Summer Pesto
In my last post, I bragged on my in-laws' stellar skills in the kitchen. Now, it's time to brag on their gardening abilities. They have the most beautiful garden behind their home filled every type of flower that will grow in the Pacific Northwest imaginable. They even grew the flowers for our wedding last year. The arrangements, which were done by my lovely mother, speak for themselves.


Not only do they grow beautiful flowers, they also have grow fresh, organic berries, fruit, and vegetables. And they are always willing to share! So when I went over to make granola in a kitchen that actually functions, I got to pick fresh vegetables. One of the things I was most excited for was the basil. I love basil! The smell, the taste, everything about it represents fresh summer recipes. With their basil producing in mass quantities, there was plenty to pick.

(On a side note, I learned that it is best to pick basil right before it starts to flower for the best taste. If it starts to flower, the basil starts to taste bitter. The only gardening tip I am capable of giving. Thanks, Karyn!)
I decided to take advantage of having a functioning kitchen at my disposal and make pesto. I love having fresh pesto around; it goes with anything from pasta, to vegetables, or it can even be used as a dip. And, with a limited kitchen right now, I enjoy having things around that are easy to cook with. To make a traditional pesto, you need:
- Fresh basil, at least 5 cups worth (make sure it is fresh as basil starts to turn black soon after it is cut)
- 1 cup of oil (I prefer to use olive oil but vegetable or canola oils work fine)
- 3-4 cloves of garlic, chopped
- 1 teaspoon of salt
- 1/2 cup to 1 cup of nuts (pine nuts are traditionally used but other nuts work, too, which I'll discuss later)
Start by pouring about 1 cup of the oil in a food processor or blender. You might want to set aside a little oil in case the basil leaves have trouble catching the blades. After you pour the oil, peel and chop the garlic clove in to small pieces and then place them in the oil. Then, take the basil leaves and cut them off the stems and in to pieces. It is better to use scissors than your hands to chop the basil to avoid staining your hands black. Once the basil is in the blender, add the salt. Then you can cover and set your blender to "liquify" to combine all of the ingredients.

Once the oil, garlic, salt, and basil leaves are combined in to a liquid mixture, you can add your nuts. I blended the basil mixture without the nuts first so I could make two different batches. Now, traditional pestos call for pine nuts. But pine nuts are really expensive, anywhere from $31 to $45 per pound, and, depending on whether or not there has been a good harvest, they can be hard to find. I have discovered, though, that many different types of nut can be substituted for the pine nuts with wonderful results. Walnuts are probably the most common substitute for pine nuts but, in talking with my mother-in-law, cashews and even macadamia nuts can be substituted as they both have a similar sweet taste and meaty texture.
I split the recipe my basil mixture in half to make two batches, one with pine nuts and one with walnuts. In the first batch, I used about 1/2 cup of pine nuts. You could probably get away with using up to 1 cup if you really love pine nuts but I think the taste is too overwhelming. Place the pine nuts in half the basil mixture in the blender and set to liquify. You may need to stir a couple of time to make sure all of the nuts are blended. Once everything is blended, place in a jar and refrigerate.
For the second batch, I used about 1 cup walnuts as I think walnuts have a milder flavor. But before I added the walnuts to the basil mixture, I toast the walnuts in a frying pan over low-heat for about five minutes. Once the walnuts are toasted, add them to the second half of the basil mixture in the blender and set to liquify. The walnuts take longer to blend, so stir a few times in between blending. Once all of the nuts are blended, put the pesto in a jar or tupperware container and refrigerate.
Once you get the combination of nuts that you like, you can play with adding other ingredients such as sun-dried tomatoes, roasted peppers, or, my favorite, parmesan. You will have a delicious pesto that will go with any summer dish. Preferably, gluten-free. :)
Favorite summer recipes? Feel free to share in the comments section!
Homemade Gluten-Free Granola
My in-laws are amazing cooks! Like, they should open their own food cart, have their pictures on jars of their own sauce kind of cooks. And lucky for us not only are they always willing to cook for us, they are also willing to share their recipes. One of my favorite things that my mother-in-law makes is granola. It is so hard to find decent gluten-free granola as the store-bought brands never taste quite right. It is either too sugary or too greasy or nothing like granola. So I was really excited when I first tasted my mother-in-law's granola. The only thing that needed to be changed from the recipe were the oats; we had to get certified gluten-free oats, which taste exactly the same as regular oats. (Just a side note, oats themselves do not have gluten. They are just highly susceptible to cross-contamination. Certified gluten-free oats have not been cross-contaminated).
To start, you can make a large batch or small batch. You can easily cut the ingredients in half. Just be careful to not, as my mother-in-law says, "Overflow your bowl!" :) You will need (for a large batch):


To start, you can make a large batch or small batch. You can easily cut the ingredients in half. Just be careful to not, as my mother-in-law says, "Overflow your bowl!" :) You will need (for a large batch):
- 4 lbs (2 large bags) of gluten-free rolled oats (My favorite brand is Bob's Redmill)
- 1 cup canola oil
- 1 cup honey (maple syrup and agave nectar also work)
- 1 teaspoon salt
- 1 tablespoon vanilla (optional)
- 1 tablespoon almond extract (optional)
- Any mixture of nuts that you like (I use almonds, cashews, pecans, sunflower seeds, and pumpkin seeds. The amount and mix you use is up to your taste)
- 1 very large bowl
- 3-4 cookie sheets

Preheat your oven to 325 degrees. In a medium-sized saucepan, combine oil, honey, salt, vanilla, and almond extract. The vanilla and almond extract are optional; I just like the flavor. Heat the mixture over low heat for 5-7 minutes until it just starts bubbling.

While the honey mixture is heating, put the oats in the large bowl. You are going to have to do some serious stirring, so if you need to split the oats in to two bowls, that's okay. Then, stir your nut mixture in to the oats.

Once the honey mixture starts bubbling, remove it from the heat and stir so you get an even consistency of honey and oil. Then, pour the honey mixture over the oat and nuts mixture. It is REALLY important to stir the oats and nuts as you pour the honey because you need everything to be coated with the honey and oil. It may work better to pour a little and then stir the oats and nuts vigorously before pouring more honey.


Once all of the oats and nuts are coated with the honey mixture, spread them on a cookie sheet. You will want to leave about 1/4 inch above the lip of the cookie sheet uncovered to keep the oats from burning. Once you have poured all of the oats and nuts, you will have about 3-4 cookie sheets full.

Place the cookie sheets in the preheated oven. Now, the temperature of the oven can be adjusted to meet your needs. 325 is a safe temperature but you can heat the oven to 350 if you will be in the kitchen watching to make sure the oats don't burn. Once they start to burn, they get really black really quickly. So, I usually like to bake them at 325.

At 325 degrees, bake the granola for 25-30 minutes. Halfway through the cooking time, remove the granola from the oven and stir so all of the granola on the edges is moved to the middle. This prevents burning. Once it is done baking, it should look like this:

Let the granola completely cool before putting it in containers. If you enclose it while it is still warm, it will get soggy. Once it is cool, you can enjoy it as snack on its own or put it in milk to enjoy it as cereal. This is a great power-up snack for any run or exercise!
Any favorite gluten-free snacks? Share them in the comments section!
A Crock Pot Love Affair: Gluten-Free Crock Pot Pasta
My husband has been spending so much time working on the house I have taken to calling it "the mistress". But, in all fairness, I have a love affair of my own...with my crock pot. Even though I complain about not having a functioning kitchen, I have secretly love getting creative with crock pot cooking. I have tried roasts, vegetables, pastas, and even desserts in the crock pot with a fair amount of success. There is something magical about mixing together a creative group of ingredients in the morning, turning on the crock pot, and coming home from work to a delicious dinner.
 Today, I was having a serious craving for pasta. But we were almost out of butane for our little camp store. Even though I have not done much in the way of pasta in the crock pot, I decided to give it a go.

Once the pasta is completely cooked, turn off the crock pot and remove the lid. Let it cool for about 15 minutes as the cheese gets pretty hot. You can easily add ground beef, turkey, sausage, or chicken to this recipe. Just cook the meat beforehand and add it to the sauce. Either way, this is a savory, easy, gluten-free meal that the gluten-free and gluten-eaters can enjoy!

Do you have any favorite gluten-free, crock pot recipes? Feel free to share in the comments section!

I decided to make a traditional pasta dish with marinara sauce and, while the results were not perfect, we ended up with a really great dinner. All it needs is a little tweaking for gluten-free perfection!
To start, you will need:
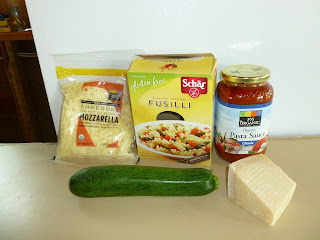
- 1 box (12 oz) of your favorite gluten-free pasta (we like Schar Gluten-Free Fusilli)
- 1 jar of marinara sauce
- Your favorite vegetables, chopped (any mix from mushrooms to peppers to eggplant would work for this recipe; I chose zucchini)
- 8 oz of mozzarella, shredded
- About 1 1/2 cups of shredded parmesan (you can add more or less depending on your preference)
- Crushed red peppers (optional)
- 3 garlic cloves, minced (optional)
- Gluten-free cooking spray (Pam Original is gluten-free, but their baking spray is not)
Soak the past in a pot of lukewarm water for about 3-5 min; then drain. While the the pasta is soaking, reduce the pasta sauce over low-heat for about five minutes. While it is reducing, I like to add crushed red peppers and minced garlic to give the sauce a little bite. But this is totally optional. Once the sauce is done, remove it from the heat. Coat your crock pot with the gluten-free cooking spray. Then, add about a half-cup of the sauce to the bottom of the pot, spreading evenly. Once the sauce is added, add enough pasta to cover the sauce. Then add 1/3 of your chopped vegetables and cover those with about 1/3 of your mozzarella and about 1/4 cup of the parmesan. Continue this process until you run out of ingredients or your pot is full. Make sure you top with all of the remaining parmesan. Add about 2 tablespoons of water to the pot. (I added 1/2 cup and it was a little too much). Cook on low for 3-4 hours. (I went over 4 hours and it was too long.)

Once the pasta is completely cooked, turn off the crock pot and remove the lid. Let it cool for about 15 minutes as the cheese gets pretty hot. You can easily add ground beef, turkey, sausage, or chicken to this recipe. Just cook the meat beforehand and add it to the sauce. Either way, this is a savory, easy, gluten-free meal that the gluten-free and gluten-eaters can enjoy!

Do you have any favorite gluten-free, crock pot recipes? Feel free to share in the comments section!
Gluten-Free Cinnamon Honey Pancakes
Saturdays are usually my long-run days, otherwise known as my excuse to eat pancakes day. Pancakes are more than just a delicious breakfast food. They represent family togetherness and the traditions of weekend mornings. They remind me of my dad making weekend breakfast for us and my mom telling him to turn down the stove so we would not have burnt globs of batter. In my post-gluten world, I am determined to keep the tradition of Saturday mornings, family, and pancakes going.
I came across a recipe for pancakes on the food.com that sounded intriguing. Instead of using refined sugar, the recipe called for honey, vanilla, and cinnamon. As I get older, I realize how important it is to limit my refined sugar intake and no longer have the diet of a gluten-free truck driver. So, in my quest to bring the gluten and gluten-free worlds together, I decided to try and make these gluten-free. With the stamp of approval from my husband, here is the gluten-free recipe for these pancakes.
You will need:
2 1/4 cups of all-purpose gluten-free flour (click on link or view previous post for the recipe)
1 1/2 teaspoons of xanthan gum
3-4 tablespoons of cinnamon
1 teaspoon baking powder (check that it's gluten-free)
1/4 teaspoon sea salt
1 3/4 to 2 cups milk (cow, soy, almond milks will all work)
2 eggs
2/3 cups honey
1 tablespoon vanilla
1/4 cup of oil (vegetable or coconut)
(Note: This recipe can be cut in half if you do not need this many pancakes. Use 1/2 cup of honey and 1 teaspoon of vanilla and cut the rest of the ingredients in half)
In a bowl, whisk together the flour, xanthan gum, cinnamon, baking powder and salt. Some gluten-free flour mix recipes will have you add the xanthan gum in to the mix, but I am pretty particular about how much xanthan gum goes in to each recipe as it is a powerful leavening agent and. it's expensive. How much cinnamon you add depends on how much you like cinnamon. You need at least 3 tablespoons, but I really love cinnamon so I add 4. Keep whisking all of the ingredients until they are completely mixed.

Once all of your dry ingredients are mixed, add in the milk. If you like a thicker pancake, 1 3/4 cups is fine. If you like a thinner, crispier pancake, you should add two cups. Then add the eggs, honey, vanilla, and oil. The honey makes the batter sticky, so make sure everything is mixed well.

Once the batter is mixed, add ladle the batter on to a greased pan and cook over very low heat. If the stove gets too hot, they will burn quickly. Trust me. Cook one side for about 4-5 minutes or until you see the batter start to bubble. Then, flip the pancake over and cook for another 4 minutes. This recipe makes about 12 medium-sized pancakes.
Once your pancakes are done, you can serve them with your favorite topping. Blueberry syrup goes really well with them as does honey. But I am a traditionalist at heart and I eat them with good ol' maple syrup.

Hopefully you enjoy this recipe! But, an important note, if you are planning a long run after eating these, limit yourself to 3. Trust me.
Any favorite gluten-free breakfast recipes? Feel free to share them in the comments section!
No comments:
Post a Comment